| March 11, 2009 | HOME | |||||||||
It pretty scary at this stage of progress to drill more holes in the panel, but it was time to install the throttle and prop controls.
For the first time, the whole panel is lit up. Not everything is functional. There is no meaningful way to test engine instruments without an engine (about to change) and in the shop, there is not much signal for the radios.
Here is a slightly better view of the Blue Mountain in split map mode -- the best I can do for now.
And Now! A moment I have been waiting for. Bill brought the engine over from the garage. He swung it from the backhoe and backed up to the shop so we can get it on the engine hoist.
I have helpers today. James Crowell, who will leave for the Army in June, brought over his engine hoist. Bill hauled engine parts from the garage and I supervised!
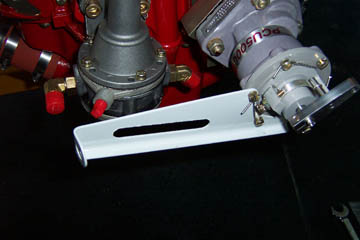
Before installation, I still had to finish up some tasks better done off the aircraft. fitting the prop controller bracket was more of a task than anticipated. It required some grinding to fit up properly to the controller.
Installed and safety wired!
|
Then there were those fittings for the oil cooler. I thought I had already installed those? It must have been one of those vivid dreams builders get as things progress.
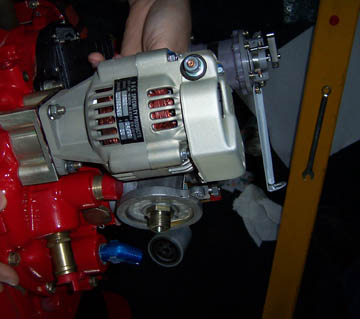
Oops! Don't forget to torque the alternator!
With James' help, we swing the engine into place. I am a little apprehensive about the mounting bolts, having heard they can be bears to get in and fit up. I decided guide James through installing them as if I knew what I was doing!
I found that the mounting bolts weren't a real problem. It took me a few minutes to figure out that the hard doughnut take the load and the soft ones absorb shock. Understanding that made it easy to determine which went where.
It took about an hour to get the bolts in and the right number of washers in place to the final tightening of the mounts.
I had some trouble fitting the final washers on the bottom mounts, but James, with stronger hands, was able to slip them in place with no problem.
Finally, I got to torque the nuts a final time. The fit was right and the engine was installed. Whew! What a feeling. This was a big step. I can't think of anything in the building process that has felt as significant as hanging the engine.
Previous Day | HOME | Next Day |
|||||||||
| ... | ||||||||||
| The page contains Kathleen Evans RV-7l of Redding CA. | ||||||||||